

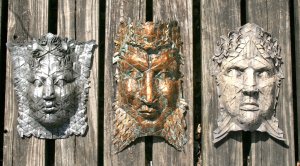
Enameled origami masks
I’ve got a bunch of origami masks available on Etsy
Click on image to go to my Etsy store

Click on image to go to my Etsy store
Click on image to go to my Etsy store
Some are older designs and some new but all feature finishes with enamels that create some interesting surfaces. It is almost impossible to capture the effects in photographs unfortunately since the iridescent glazes change in different lighting and angles.
New masks
Just posted some new masks on Etsy, featuring new variations on warrior faces with crested Hellenic helmets, corrugations and curlicue beards.

Menelaus

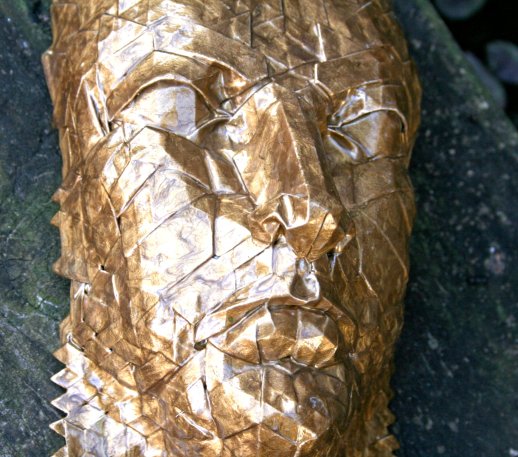
Gold Dragoon
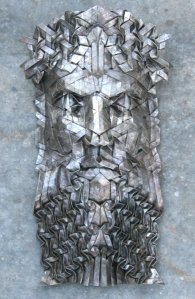
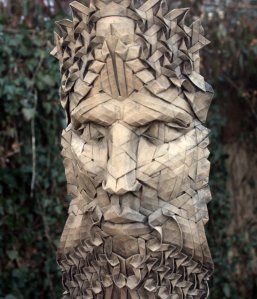
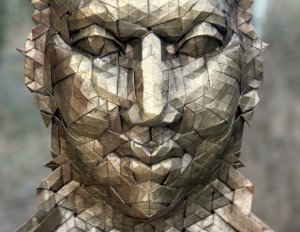
New masks and new techniques
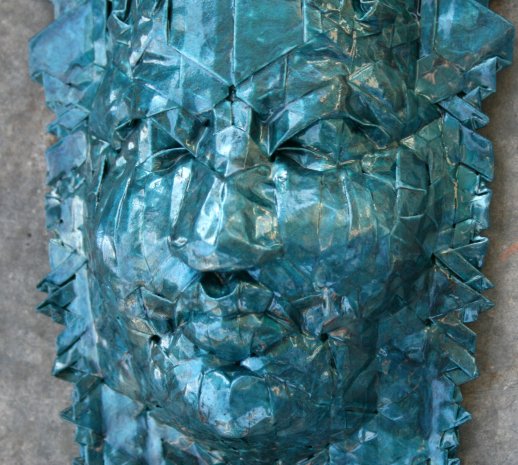
I’m always looking for new ways to finish my origami. Lately I’ve been playing around with some solvent-based paints which I’ve used to create effects that make the paper look more like glazed ceramic.
I’ve never worked with these type of enamel paints before and I’ve gone through a lot of trial and error (mostly error) to figure out how I can use them to their best effect. I’ve had at least three that I think worked pretty well, and they are available for sale on my Etsy site
![il_fullxfull.929111219_d0zg[1]](https://joelcooper.files.wordpress.com/2016/02/il_fullxfull-929111219_d0zg1.jpg?w=518)
![il_fullxfull.927152717_kb8b[1]](https://joelcooper.files.wordpress.com/2016/02/il_fullxfull-927152717_kb8b1.jpg?w=518)
![il_fullxfull.922623890_hkv8[1]](https://joelcooper.files.wordpress.com/2016/02/il_fullxfull-922623890_hkv81.jpg?w=518)
They’re variations on some previous designs but what makes them each unique is the quality of the surface, which is unlike anything I’ve done before. The translucent enamels give them a depth which I find really appealing.
Origami House – Colonia, Uruguay

The Origami House is a new museum of origami in the works in historic Colonia del Sacramento in southern Uruguay, just across the mouth of the Rio de la Plata from Buenos Aires. Maybe not the first place you’d think of when you think of origami, but a more beautiful site you would be hard pressed to find. And besides, Japan already has an origami museum; Spain has the EMOZ , Escuela Museo Origami Zaragoza – but this may be the first museum in the Americas dedicated solely to paperfolding.
The fledgling endeavor has an Indiegogo account set up to accept donations to help it get off the ground. Money will go towards pedestals, displays, etc. as well as the modifications necessary to make the existing structure appropriately climate-controlled for the display of origami. Many of the participants of the recent Folding Paper travelling exhibition (myself included) have donated their pieces from the show to reside in the new museum. Some of the money donated will go toward shipping costs to get these artworks to the new site.
Not just a gallery, the Origami House will be a genuine museum with collections of books, artifacts and documents related to the history of origami in addition to displaying examples of paper-folding from around the world.
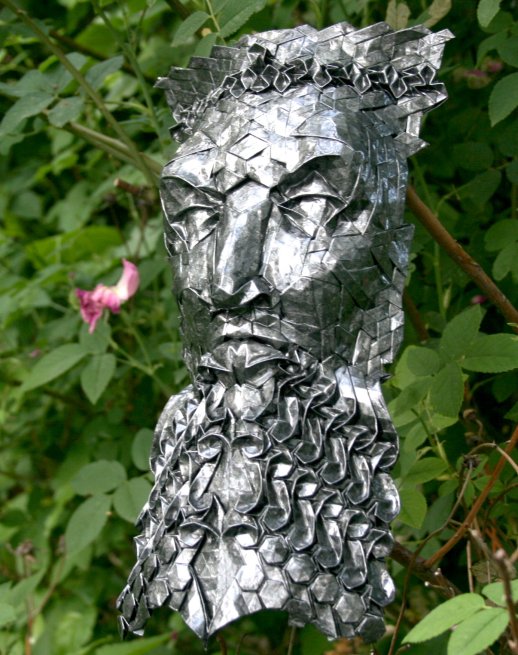
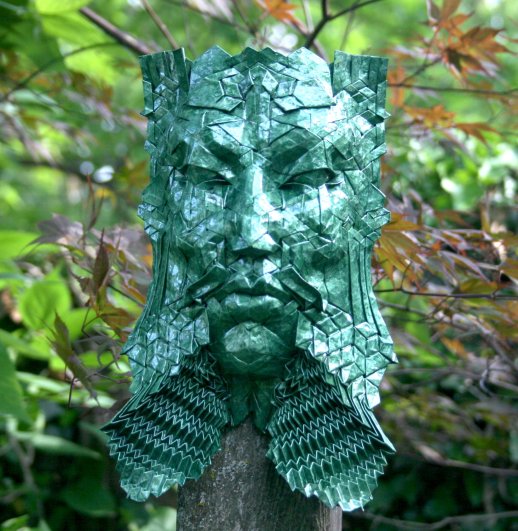
New masks and not so new masks
click on image to go to my Etsy shop
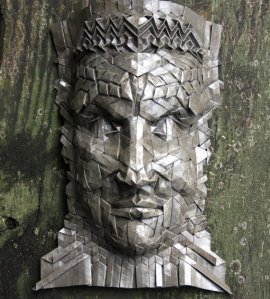
I’ve got some new masks available for sale in my Etsy shop. There are three that have just returned from the Masqalors show in Quebec (those would be the aforementioned “not so new masks” although they are only a little more worldly for their recent trip across the border). You may also find three new variations that I’ve been working in the last month or two. The new masks feature techniques of “origami corrugation” to create interesting decorative patterns.
new Helios mask
I’ve used a band of corrugation as a decorative motif across the top of this mask as well as the Charlemagne mask above.
This is something new to me but a technique that has been well employed by other folders like Ray Schamp and Andrea Russo and many others. I’ve only incorporated small areas of corrugation as flourishes, but found the approach both rewarding and surprisingly tricky. Ben Parker has had more practice combining corrugation and traditional tessellation than I, and he makes it look easy.
Masq’alors!
 If you happen to be around Saint-Camille, Quebec, next week drop by the biennial Masq’alors! festival. It’s a festival of masks going on from May 28 through June 7.

Traditional masks, exotic masks,

fantastical masks, theatrical masks and even a few origami masks.
Yes, some of my own masks will be there too.
If you have an opportunity, don’t miss it!
The festival is an event started by the Productions des paysages éclatés, a group of creative people dedicated to promoting and celebrating artistic expression and culture in everyday life through events like Masq’alors! (the exclamation point is mandatory) as well as workshops for all ages.
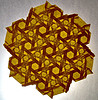
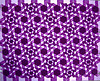
Suncatcher tessellations

Click on image to see Etsy shop
I’ve been working on something new lately. These are small origami tessellations, 10-12 cm. wide, folded from hexagons of simple bond-weight colored paper. The difference is in the finishing. After they’re folded, I saturate the paper with a one to one mix of melted beeswax and damar resin. This is a traditional basis for encaustic painting, but without pigments it makes the the paper translucent. The mix also makes the origami rigid and durable. The beeswax keeps the object from becoming too brittle and the damar resin raises the melting point of the wax so the suncatcher doesn’t go soft in the sun. I’ve created a new section in my Etsy shop, as well as an album in my Flickr photostream where you can see many more designs.
New masks on Etsy
I’ve spent most of the last month working out the kinks in a particular new mask design. Once I get an idea in my head I tend go over it again and again until I’m either satisfied I’ve found the best solution or I’ve at least exhausted all the possibilities I can think of. That usually means a slew of masks representing variations on the same theme, so that I can see which ideas work and which do not.
The latest idea has been rather fruitful, and so far I’ve made three variations that I think came out pretty well:
Constantine

click on image to go to my Etsy store
Neptune
Click on image to go to my Etsy store
and Triton
Click on image to go to my Etsy store
They are all based on the same design, the most obvious difference is that Neptune and Triton have beards and Constantine does not. I wanted to design a mask that could go either way, so to speak. The eyes and nose of all three are essentially the same and the headdresses have only minor differences.
I’ve still got some more ideas to work out with this design you may see more in this line soon.
The fourth mask is a bit of a break:
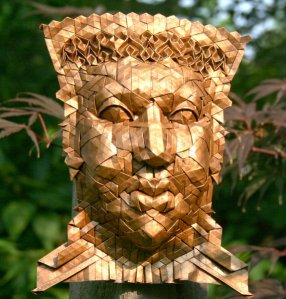
Helios
Click on image to go to my Etsy store
This is a design from last year that I wished to develop a little further, and something with a slightly more pleasant expression. Those other three seem a bit cranky for some reason. I don’t know why so many of my masks come out like that, it’s not like I’m trying to make them all look angry.
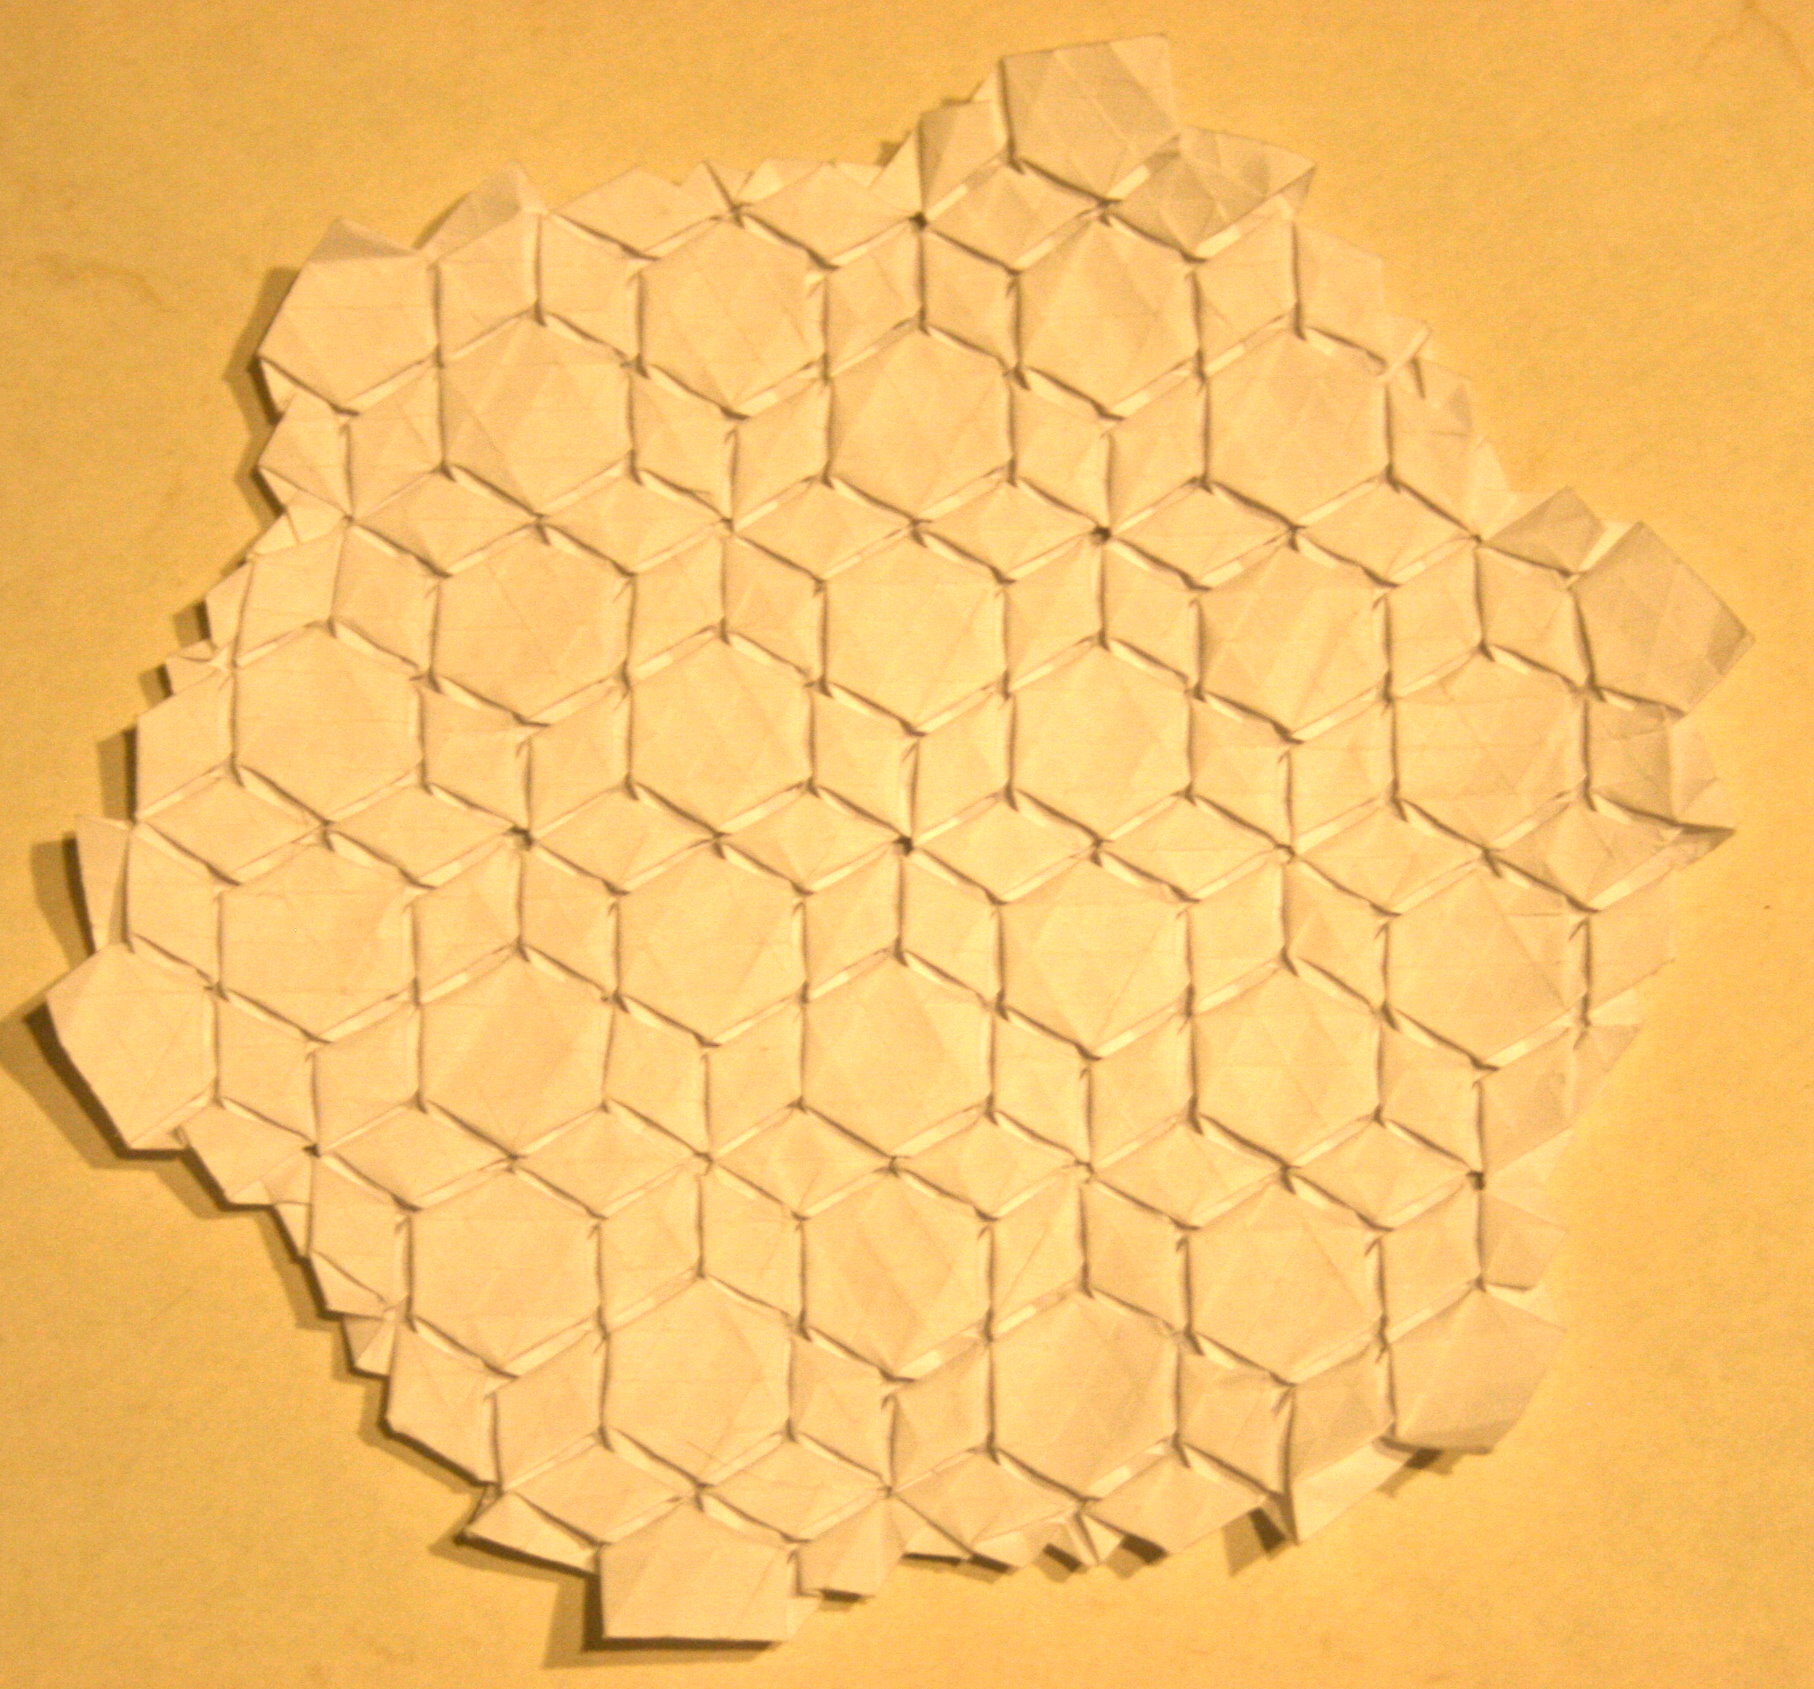
Folding a flagstone tessellation
 A tessellation is a pattern of repeating geometric forms that can interlock to fill a space infinitely. In origami tessellation, a discrete unit of folded shapes that can be repeated to make a tessellation is sometimes called a “molecule”.
This molecule is an example of a style of tessellations I started folding almost a decade ago that I took to calling “flagstones”. Combining shapes like rhombus twists and open backed hex twists on the front with triangle and closed hex twists in the back allows the shapes in front to sit right next to each other with only a sort of “grout line” separating them. It reminds me of tiles or paving stones, hence the name.
I’ve made a video of folding a star and hex molecule, consisting of a cluster of rhombus twists in a star formation surrounded by hexagonal twists. This unit can be reiterated to fill as much space as the piece of paper will allow.
my flickr photos