
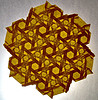
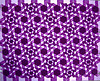
Tiny tessellations
I’ve done tiny tessellations before. They’re fun and challenging in a different way than ordinary tesses.
They also have the advantage of taking much less time to complete. They may take two or three hours to fold, but that is a far cry from some of the very large, involved models that I’ve done which may take two or three weeks, or in some cases several months.
As an antidote to some of the larger projects I’ve been preparing for the past few months, I’ve done several tiny tessellations to break up the drudgery of precreasing very, very big grids. I’ve created a new set on my Etsy shop to sell these cute little tessellations and you can check them out here. 


Hello Joel.
I’m a huge fan of your work. When people ask me why I love origami I show them your blog and photos and watch the look of amazement on their faces. You really have taken tessellations to another level.
My favourite piece is the Gnome King, it’s so realistic. I’ve managed to deconstruct most of it but got stuck on the beard. I noticed it’s based on your Brambles tessellations and still can’t work out how you’ve got the twist in. It looks like a series of incomplete triangle twists but all I end up with is a ripped or screwed up bit of paper. Any hints or explanation you could give to explain how to do it would be most appreciated.
Thanks for being such an inspiration.
LikeLike
Oh, that tessellation pattern is not easy to fold and it is even harder to explain. I use twists like those in a lot of dimensional tessellations. They’re based on hex twists with two sides inverted – that is, the hex twist is collapsed with four pleats falling in the usual way and two on opposite sides tucked inside out, as it were, with mountain folds switched for valley folds. I’m really awful at explaining it, but maybe some of the images that my friend Mimickr on Flickr made deconstructing some of my folds could help: http://www.flickr.com/photos/origami_joel/sets/72157594157584074/
The “iso-area” twist is an example of the hex twist with alternating pleats inverted – three pleats go out and three pleats go in and the twist looks the same on the front of the paper as on the back.
I don’t know if any of this helps, but it might keep you busy for a while!
LikeLike
i can’t find this mask. how did you get to it?
LikeLike
This is the Gnome King: https://www.flickr.com/photos/origamijoel/5381770501/in/set-1783175
LikeLike
Hello,
I’m almost gutted you responded to me. I finally managed to work it out last night on my own! I worked it out from another tessalltion of yours that I can’t remember the name of (it was yellow/ gold with pink splodges). Well, I worked out the crease pattern and have no idea how to fold it easily and solidly. (If you want it I can scan it in and e-mail you or something – I’m not great on technology hence why I love folding a piece of paper.)
Thanks, though, that link you sent me really helps – because I tend to need a flat surface to create the twists and figured there must be some way of constructing the beard flat and pull it into shape afterwards.
I can see why you don’t do crease patterns for your masks, there is an element of artisitc judgement when it comes to the actual face part and shaping. I have marked a CP to help me deconstruct and repeat what you’ve done (because I keep running out of paper) but it’s probably a bit of a mess.
It’s only in the deconstruction of your work I can see the ingenuity that’s gone into creating it. Thanks again and I look forward to see more of your creations.
LikeLike