
Painting paper and folding a mask
I mentioned previously the “bubble method” used to paint some of the papers I’ve used for folding. Here’s a little more about the technique and a little insight into folding a mask as well.
This will be black elephant hide painted with three different water-soluble paints: basic white acrylic, blue/gold metallic and gold/green interference paint. The combination of a basic contrasting color – in this case white to contrast the black paper – and a metallic color, seems to give good results and the interference paint has a subtle effect; it doesn’t have much color of it’s own, but creates a bit of a sheen on a dark background that shifts from one color to another in different light. My wife has collected many different kinds of paints, dyes and inks over the years and she likes to experiment with them in different combinations to see what they can do. This painting is such an experiment.

Three containers are prepared with a little bit of water, a glob of dish detergent and an equal blob of paint (proportions are approximate). The paints, soap and water are mixed thoroughly and brought out to the paper which has been laid out on a bunch of newspaper (the following process can get messy).
And the bubbling begins!

Just stick a straw in the paint mixture and blow. You probably used to do this in your milkshake as a child, to your parents’ consternation. Maybe you still do. The technique is pretty much the same, except the soap will make the mix foam up rapidly.
Now my wife found this technique online and in that tutorial it was recommended to foam up a large bowl of paint and holding the paper over the bowl, lower it into the bubbles. The paper we have here is too large to do this and the bubbles don’t really want to stick to the elephant-hide paper (one of the qualities of elephant-hide is that it is relatively stain resistant). So we lay the paper out and spoon the foam onto the paper.

Just pile it on.
Now you have to wait a while for the bubbles to dry and break down and on elephant hide the effect is fairly subtle. Once the above mess had dried, my wife did it all over again for another layer and it was still fairly subtle, but the over-all effect is a kind of cloudy, cobwebby distribution of color. Very nice.
Paper successfully painted and looking much better than it did before, I have to figure out what to do with it. I had been doing some modifications on the recent “Oread” design that I was eager to try out, and I thought it would be worthy of some really nice paper. Only one potential problem: the mask is 96 creases across at a minimum and the paper is 35cm wide.
Let me explain. Each model has a minimum number of folds necessary to fully realize the form. Whatever grid I use must have at least that minimum number of creases to accommodate them. More complex pieces have more folds. Most of my earlier masks are on grids 64 pleats across. The more recent designs have more complex folds and require grids 96 pleats across. The numbers aren’t arbitrary – the grids are folded by either dividing the paper in half or in thirds and then dividing each of those sections in half, and each of those halves in half, and so on until the proper number is achieved (this is an “accordion” or “fan” fold). Ultimately, the number of divisions will equal x times 2 to the nth power, where x is the starting number of divisions and n is the number of times the divisions are halved. So if you start with a paper divided in two and then divide each section in half 5 times, you get 2 times 2 to the fifth power = 64 divisions. If you start with paper divided into thirds, you get 3 times 2 to the fifth power = 96. Trying to get a grid with a number of divisions that doesn’t follow this formula gets messy, so I try to stick with grids that are 32, 48, 64 or 96 divisions across.
Usually this works out fine, because the paper I use comes in sheets 100 x 70 cm. I can cut it in half and get a piece of paper 50 cm. wide for a grid 96 pleats across and each pleat will be a little more than 5 mm. wide – a good size to work with. I can cut the paper into quarters and have sheets that are 35cm. wide that will take a grid 64 pleats across and the pleats will still be a little over 5 mm. wide.
But what I have here is a piece of paper 35 cm. wide and I need a 96 pleat grid for the mask I wish to fold. The pleats will end up being almost 3.5 mm. wide. That’s a little smaller than I would like. But not impossible.

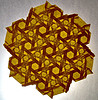
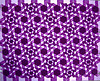
The paper is actually about 34 cm. across; I had to trim the edges a bit. You can see in the back view below that the pleats are about a third of a cm. wide. The paint doesn’t effect folding much. I didn’t crack or flake off. The paint or the soap or the combination of both gives the paper a slightly waxy feel, but the paper still folds cleanly.

The design I’m going to fold is recorded in this rather sad looking piece of paper.

You can see the remnants of a face in the front view. Below that is the back view, which actually has the most useful information – all the nuts and bolts that hold the design together. It looks a mess because it has been folded, unfolded and folded again over and over as I worked out the right combination of creases to get what I wanted. It will serve as a sort of road map when I start folding the new mask. I don’t write down or diagram anything – I just have a bunch of these partially folded pieces that I use for reference.

I started folding at the top and worked down the center line and on the left side of the face, consulting the “road map” with each fold.

At this point. more than half of the mask has been folded, and I don’t need the road map anymore. The mask is symmetrical so I can use the information on the completed side to fold the rest of the mask.

Finished!


Awesome! I like the colors that you use to paint! It’s very stylish!
LikeLike
What was it like folding the first mask?
I tried making a mask in tessellation by looking at one of your masks, it felt like molding clay into a mask at first for me.
At some point when using the valley and mountain folds I found this to be a journey of fun.
I hope that someday this could be taught to people.
Thank you for your time.
LikeLike
Excuse me mister cooper but I would like to know, do you precrease the grid then cut the hexagon, of do you cut the hexagon first? Thankyou very much if you answer. Keep up the good work Mr Cooper!
LikeLike
It’s easier to cut the hexagon first and then fold the grid, if I know that I want a hexagon. Sometimes I precrease the grids before I know what I’m going to do with them, and then I fold a full rectangle and cut them down as necessary later.
LikeLike
ok thanks very much Mr cooper!
LikeLike
both method and result are fascinating!!
LikeLike
Pingback: Как красить бумагу для оригами | Планета Оригами
Pingback: New Tessellated Origami Masks by Joel Cooper | multiplode6.com
Pingback: New Tessellated Origami Masks by Joel Cooper | My Website
Pingback: Origami Masks by Joel Cooper on SocialRouge.ca
Pingback: Maschere astrali ricavate dalle increspature della carta - Il blog di Jacopo Ranieri
Pingback: Le Maschere Origami di Joel Cooper | FOLLIA CREATIVA: inspiration, spot, guerrilla, flash mob, viral
Pingback: Tessellated Origami Masks Covered in Intricate Patterns | Must See
Pingback: New Tessellated Origami Masks by Joel Cooper (11 Photos) | FunCage
Pingback: New Tessellated Origami Masks by Joel Cooper (11 Photos) - My Website
Pingback: Conheça as máscara de origami de Joel Cooper
Pingback: Tessellated Origami Masks by Joel Cooper | Inspiration Grid | Design Inspiration
Pingback: Origami masks created by Joel Cooper - OZONWeb by OZON Magazine | OZONWeb by OZON Magazine
Pingback: Origami masks created by Joel Cooper - OZONWeb by OZON Magazine | OZONWeb by OZON Magazine
Hi! I think your work is amazing and the result is even more! I just wanted to ask if this color technique could be applied on tissu/textile as well?
many bravo anyway!
LikeLike
I don’t know – it would probably depend on the paints. You just have to try it and see.
LikeLike
Joel I love your work origami is my passion I’m always striving to do more beautiful and complicated pieces. you have been an I inspiration for me. Have you considered taking an apprentice or? for me this would be a dream. Please let me know your thoughts I’m eager to learn.You can email if you would be so inclined mikeboz80@gmail.com
LikeLike
Pingback: Origami maske by Joel Cooper | Pixelizam
Pingback: You Would Not Believes What These Masks Are Made Of. The Artist Is A Real Master! Wow! » 5Trend
Pingback: Conheça as máscara de origami de Joel Cooper - Adoro Papel
WOW. I want to do this but my origami skills are nonexistent… Better start off on something small 🙂
LikeLiked by 1 person
Hello Mr. Cooper,
i am a humongous fan of your masks and origami work in general. I have questions concerning the folding of a mask. i can crease a triangle grid with no problem, I’ve practiced all of the required tessellations, looked at your steps on the models you’ve created but i just don’t know how or where to start. I’ve created a few models but i just cant seem to form any of the facial features constructed. if you have any tips or instruction that can help please email me at (SorryItzLeo@gmail.com)
Thank you so much,
Leo
LikeLike
neat fold, ill try bubble method and add mc
LikeLike
Pingback: ‘Naiad’, Designed by Joel Cooper – Tom's Origami
Pingback: ‘New’ Tessellations – Tom's Origami